



-
-
-
Total payment:
-




How to Treat Mold on Plywood – A Complete Guide to Causes, Cleaning, and Prevention
Posted by Hoàng Anh Tuấn at 28/05/2026

You pull out an old plywood shelf from the garage, or you notice dark spots spreading across your brand new bathroom cabinet. Mold on plywood isn't just ugly – it can weaken the panel and trigger allergies. But here's the good news: most mold can be removed with common household products if you catch it early. This guide walks you through exactly how to clean mold off plywood, fix the moisture problem, and choose waterproof plywood that won't grow mold again.
Why Does Plywood Get Moldy?
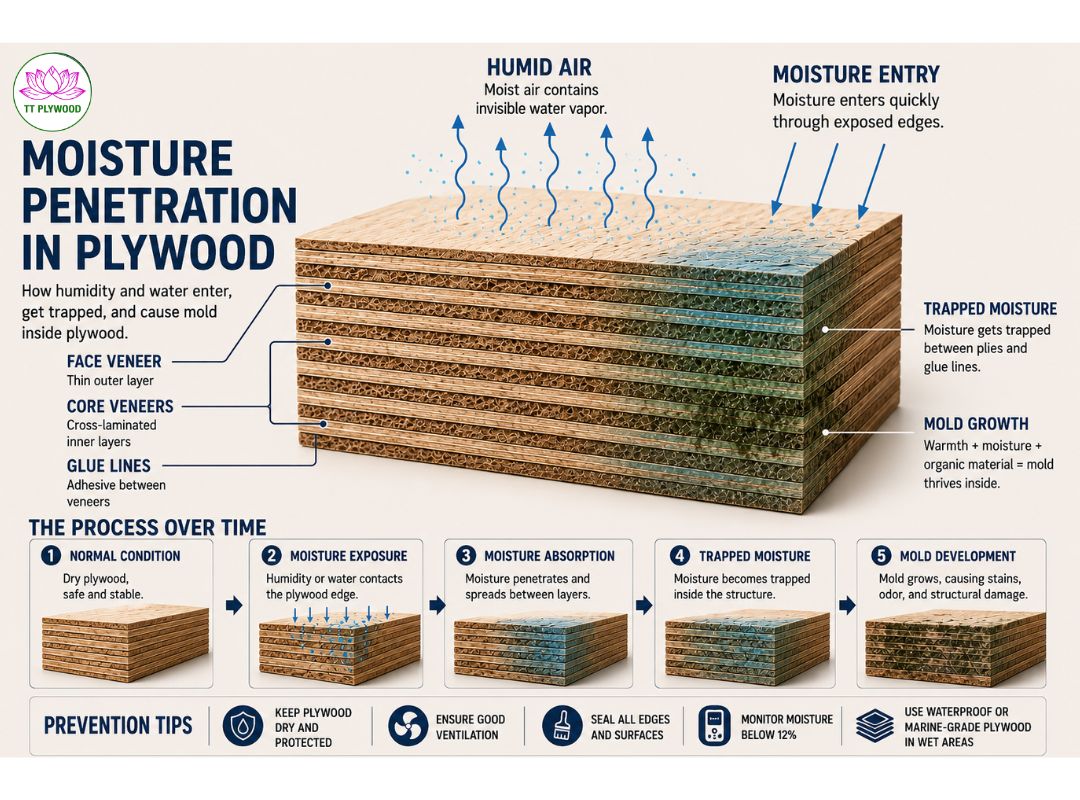
High humidity (above 70%) and poor ventilation
Mold needs moisture to grow. When indoor relative humidity stays above 70% for more than 48 hours, airborne mold spores land on plywood surfaces and begin colonizing. Poor ventilation makes it worse – bathrooms, basements, and closed storage rooms trap humid air. Unlike solid wood, plywood has multiple layers and adhesive lines. If moisture seeps in, it gets trapped between plies, creating a perfect environment for mold.
Direct water exposure from leaks or floods
A leaking pipe, a flooded basement, or rain blowing through an open window – direct liquid water soaks into plywood within minutes. Standard interior plywood absorbs water rapidly through its edges and any unsealed faces. Once wet, it can take weeks to dry naturally, and mold starts developing in as little as 24 to 48 hours. Even a small, unnoticed leak behind a cabinet can turn the back panel into a mold farm.
Using non‑waterproof plywood in wet areas (bathroom, kitchen, exterior)
This is the most common mistake. People install regular interior plywood in bathrooms, kitchen cabinets near sinks, or outdoor sheds. Interior plywood uses Melamine Urea Formaldehyde (MUF) adhesive, which is not waterproof. It resists occasional humidity but fails when exposed to condensation or splashes. For wet areas, you need exterior plywood, waterproof plywood with WBP phenolic adhesive, or marine plywood. Skipping this step is why mold keeps coming back.
How to Identify Mold on Plywood
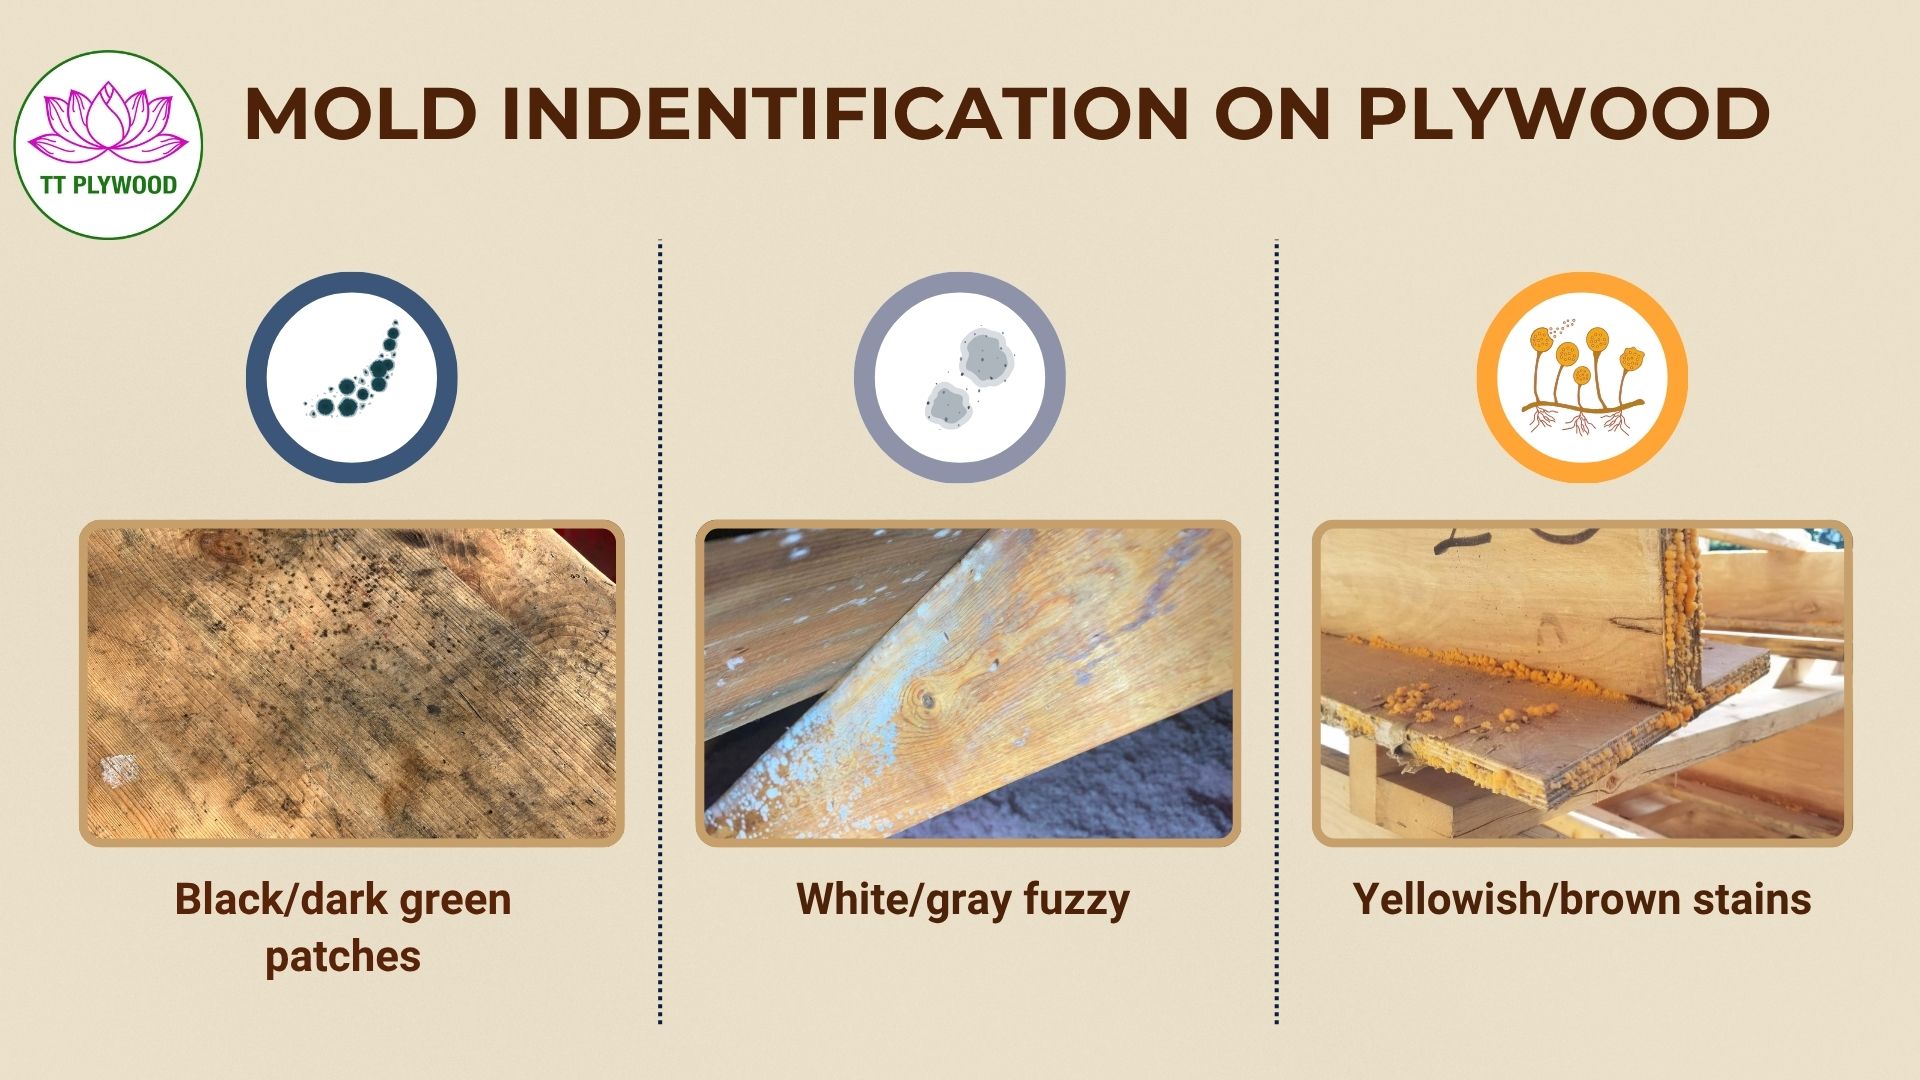
Black, green, or white fuzzy spots
Visible discoloration is the first sign. Mold on plywood appears as:
- Black or dark green patches – most common, often start in corners or along edges.
- White or gray fuzzy growth – powdery mildew, typically on surfaces with high humidity but less standing water.
- Yellowish or brown stains – early stage, sometimes mistaken for dirt.
If you see spots that wipe off easily with a dry cloth but return within days, it's an active mold.
Musty odor and surface discoloration
Even before you see visible growth, smell the plywood. A persistent earthy, musty odor indicates mold spores are present, even if they haven't formed colonies yet. Surface discoloration that darkens after rain or high‑humidity days – without direct water contact – is another clue. This happens when the wood's moisture content rises above 16%, triggering fungal activity.
Delamination or soft spots (advanced rot)
This is the late stage. When mold and moisture have penetrated deep into the plywood, the layers begin to separate. You'll see:
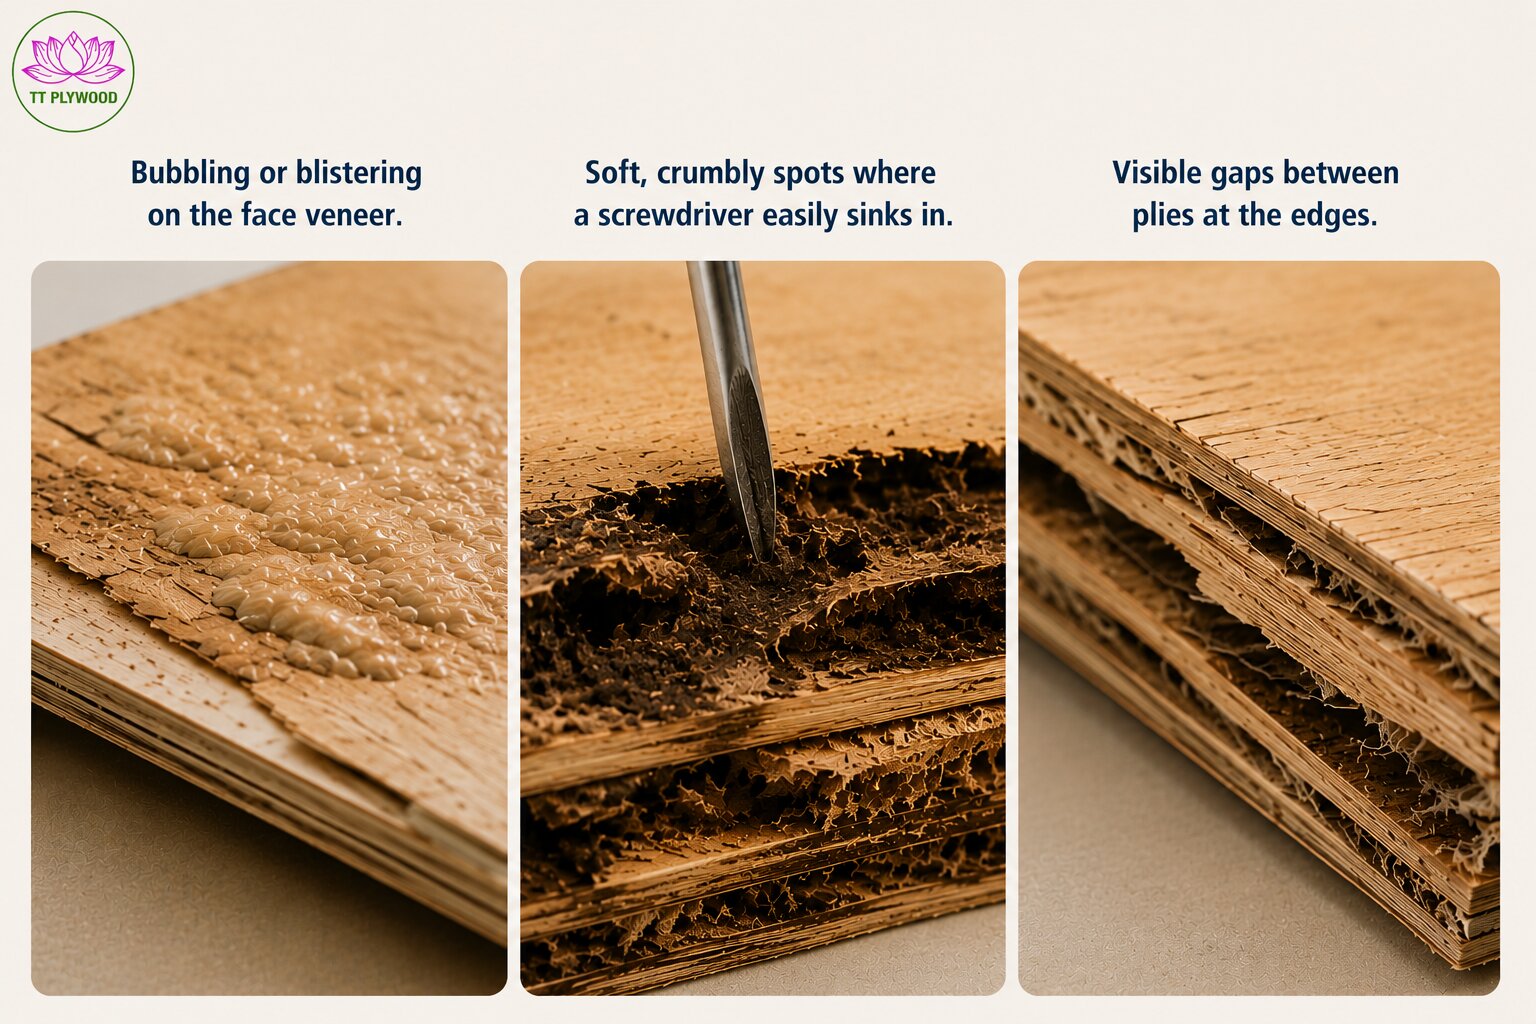
At this point, cleaning won't save the panel. You must replace the affected plywood. Advanced rot compromises structural strength, and no amount of sealing or drying will restore it.
Step‑by‑Step Guide to Remove Mold from Plywood
Safety first – wear N95 mask, gloves, goggles
Mold spores become airborne the moment you scrub or sand. They can cause eye irritation, coughing, and allergic reactions. Before you start, take these precautions:
- Wear an N95 or P100 respirator (not a simple dust mask)
- Use nitrile gloves and safety goggles
- Work in a well‑ventilated area – open windows, use a fan blowing outward
- Cover nearby surfaces with plastic sheeting to prevent cross‑contamination
If the moldy plywood is larger than 10 square feet (about 1 m²), consider professional remediation
Clean surface mold with white vinegar (1:1 water) or 3% hydrogen peroxide
For light surface mold that hasn't penetrated deep into the wood, use one of these two household solutions. Do not mix them.
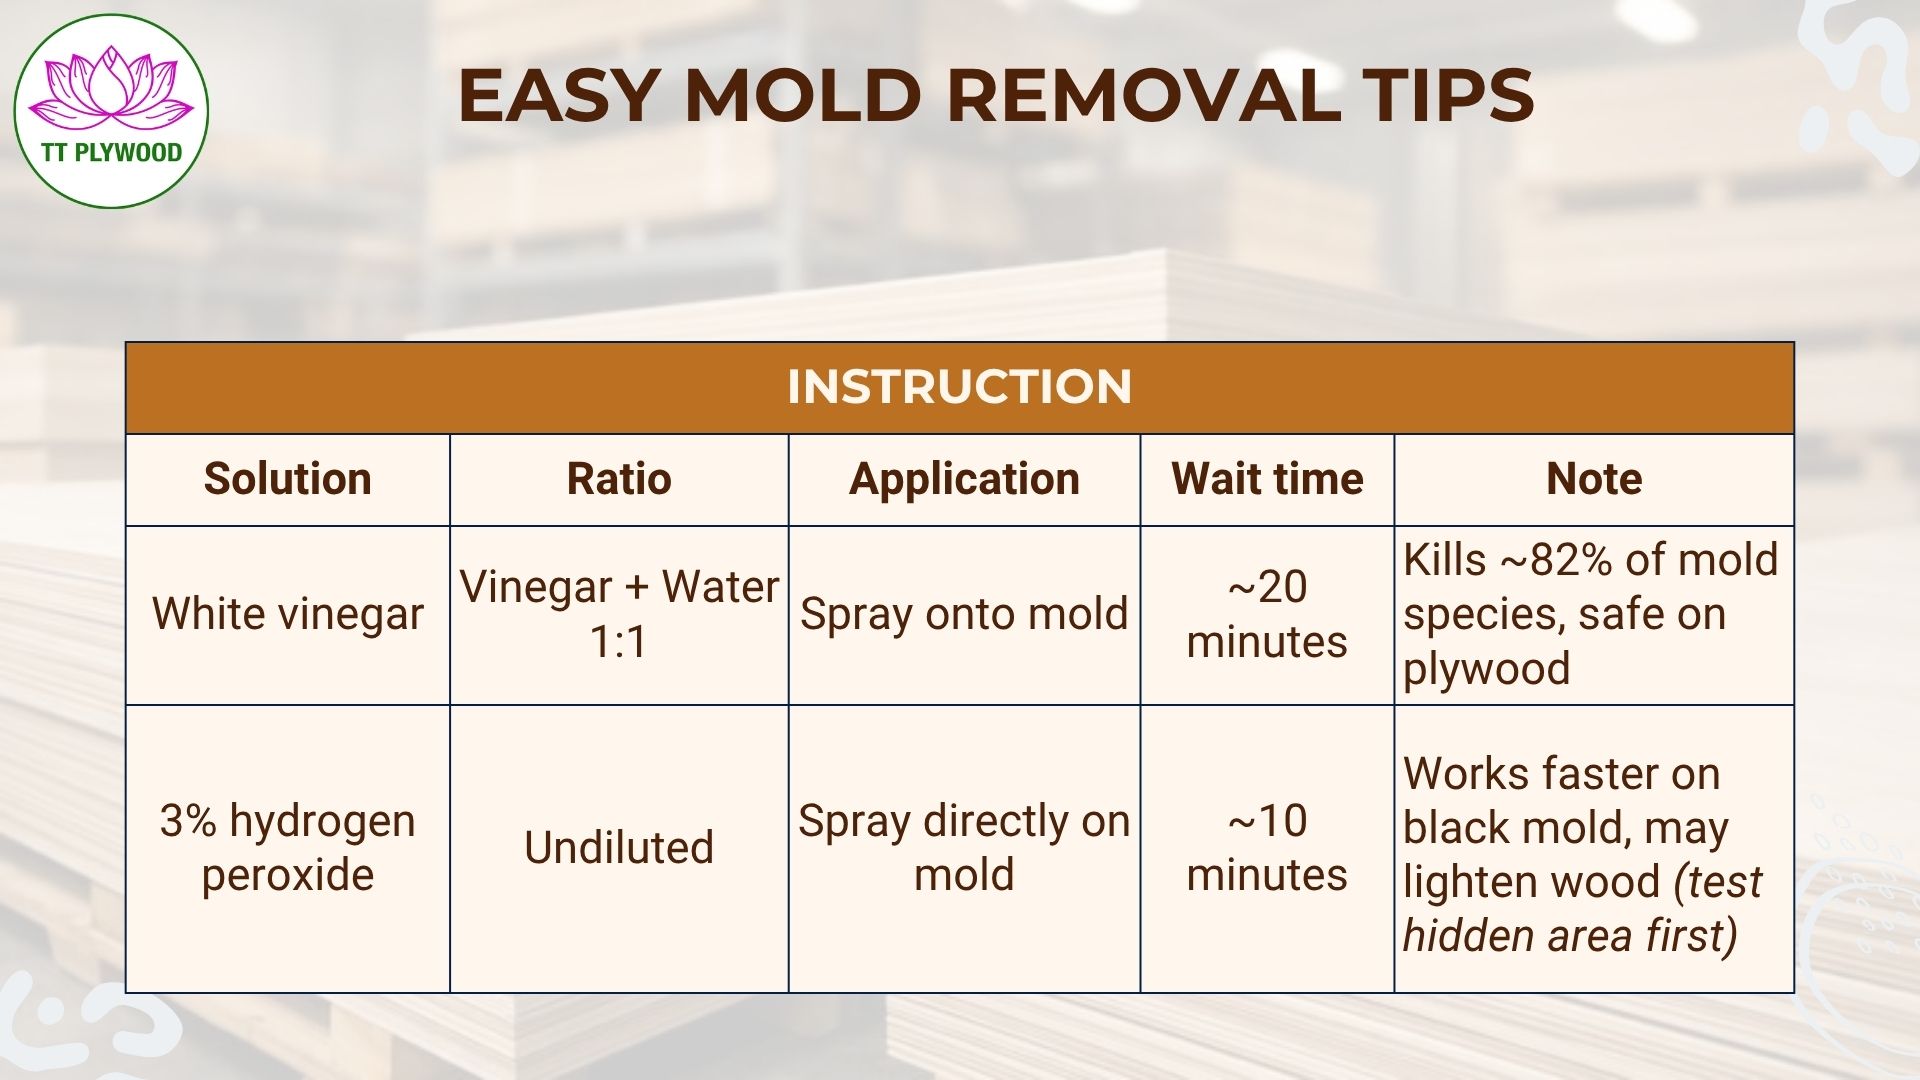
After scrubbing with a soft brush, wipe with a damp cloth and dry immediately. If mold remains after two cleaning attempts, move to the next step.
For deeper mold – sand lightly after drying (use 120‑150 grit)
If mold has penetrated below the surface:
- Let the plywood dry completely after cleaning (24–48 hours in a dry room).
- Use a random orbital sander with 120 ‑ to 150 grit sandpaper.
- Sand lightly – just enough to remove the stained layer. Do not sand through the top veneer.
- Vacuum dust with a HEPA filter vacuum. Wipe with a tack cloth.
- Re‑clean the sanded area with vinegar solution to kill any remaining spores.
Only sand dry plywood. Sanding wet plywood spreads mold and damages the fibers.
Apply a biocide or borax solution to kill remaining spores
After cleaning and sanding, apply a mold biocide or borax solution to prevent regrowth:
- Borax solution: Mix 1 cup borax (sodium tetraborate) with 1 gallon warm water. Apply with a sponge or spray. Borax leaves a crystalline residue that inhibits future mold. No need to rinse.
- Commercial biocide: Look for products labeled for wood (Concrobium, Benefect). Follow label instructions.
Do not use bleach on plywood. Bleach does not penetrate wood fibers – it only whitens the surface. Mold roots remain alive and will return within weeks. Bleach also damages the lignin in wood, weakening the plywood.
How to Dry and Seal Plywood After Mold Removal .
Dry thoroughly – moisture content must drop below 12% (use moisture meter)
After cleaning, the plywood may still contain trapped water. You cannot seal it until the moisture content (MC) falls below 12%. Use a pin‑type moisture meter:
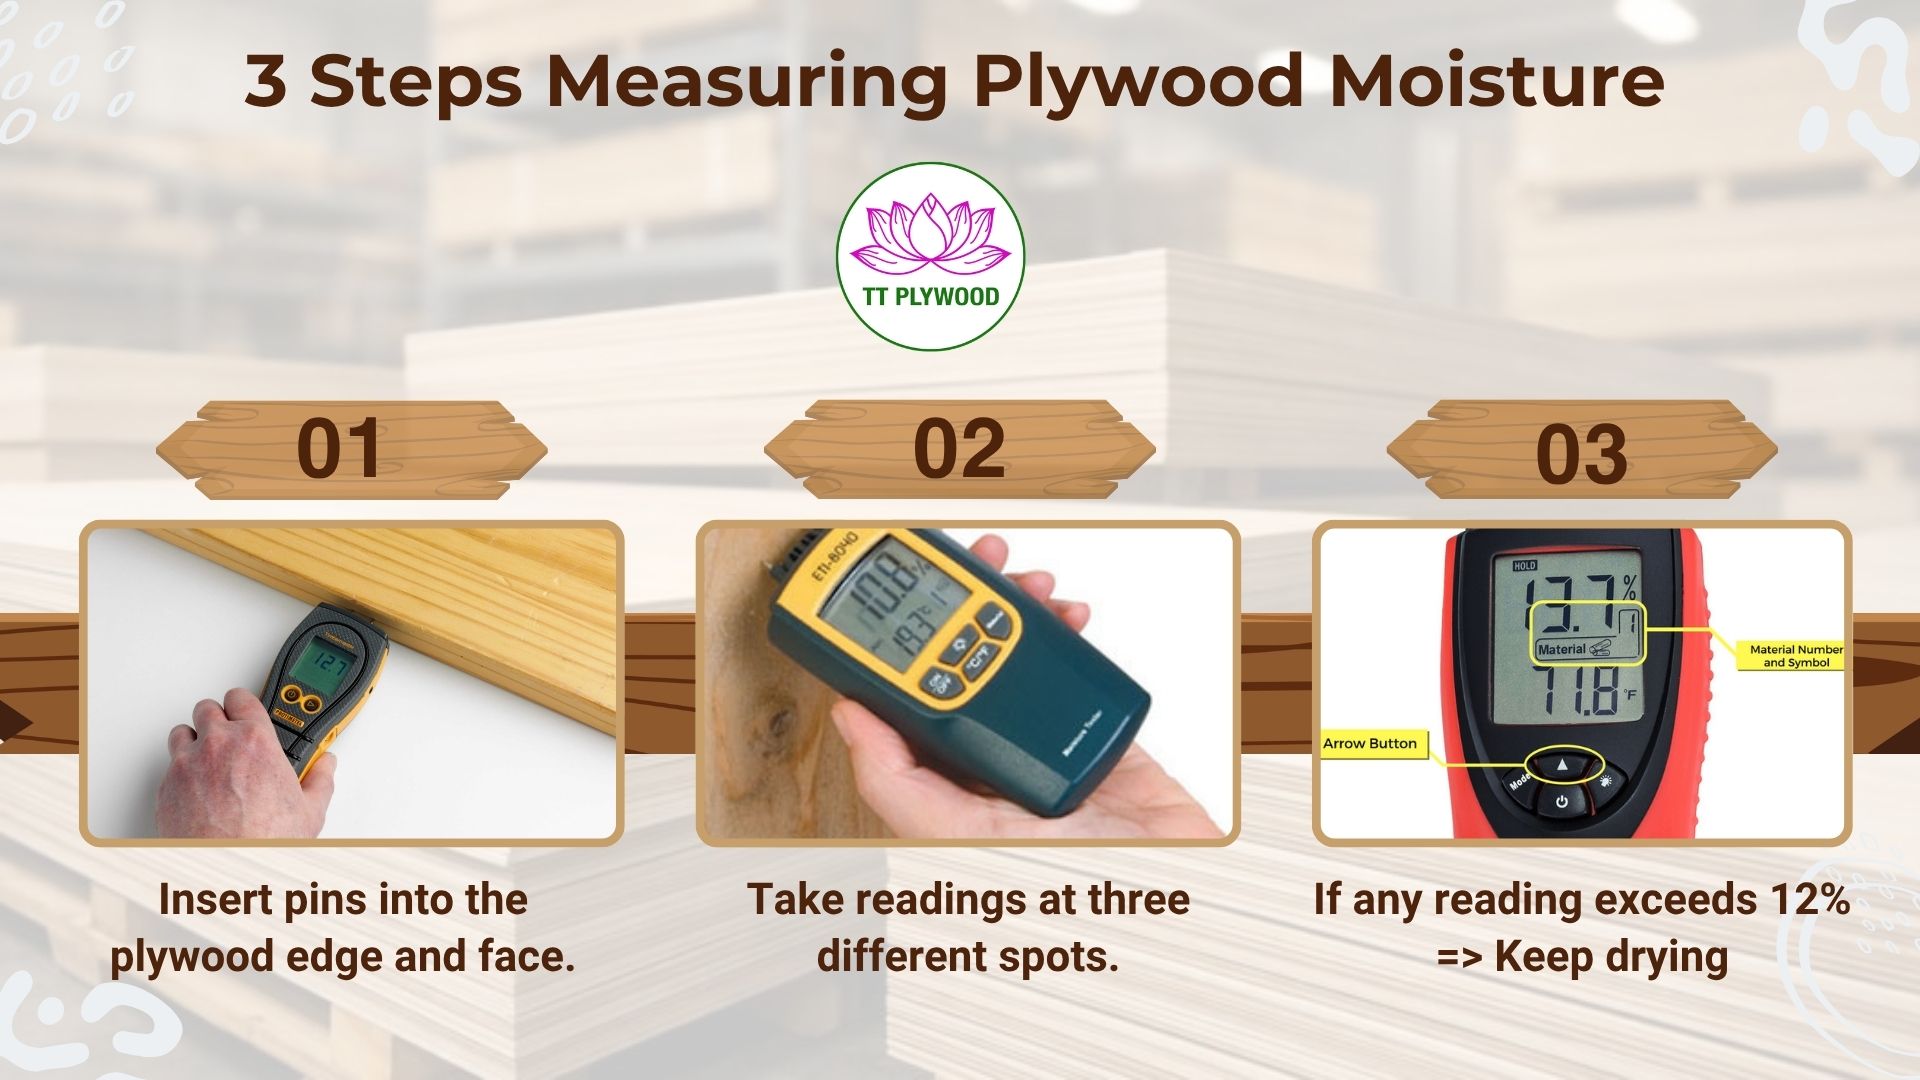
Drying methods:
- Place plywood vertically with spacers between sheets for airflow.
- Use fans and a dehumidifier in a closed room (target humidity 40–50%).
- For small pieces, leave in direct sunlight for 2‑3 hours (only if no warping risk).
Do not apply any sealer or paint until MC ≤12%. Sealing moisture inside will cause delamination and rot.
Seal edges and faces with waterproof primer or exterior paint
Plywood edges are the weakest point – they absorb moisture 5‑10 times faster than faces. After mold removal and drying:
- Edges: Apply two coats of waterproof primer (oil‑based or shellac‑based) or exterior paint. Let each coat dry fully.
- Faces: If the face veneer is damaged, sand smooth, then apply exterior grade primer followed by exterior latex paint or spar urethane.
For plywood that will be used outdoors or in high‑humidity areas, consider sealing plywood with a penetrating epoxy sealer. This seals deep into the wood fibers.
Use sealing plywood techniques (edge banding, epoxy sealer)
For furniture or cabinets where you want to keep the natural wood look:
- PVC edge banding (1mm thick): Apply with a household iron. The melted glue seals the edge completely.
- Wood veneer edge banding: Glue on, then trim. Less waterproof than PVC but matches the face.
- Penetrating epoxy sealer (e.g., Smith's Clear Penetrating Epoxy): Brushes on. Seals deep into the wood, ideal for marine applications.
Even with sealing, never use interior‑grade plywood in a shower or directly against soil.
Best Plywood Types to Prevent Mold
Waterproof plywood (WBP or phenolic) – ideal for bathrooms and outdoors
Waterproof plywood uses WBP (Water Boiled Proof) phenolic adhesive, which does not break down in wet conditions. This glue is the same as what's used in marine plywood. Applications include:
- Bathroom vanities and cabinets
- Outdoor furniture
- Shed walls and roofing
- Concrete formwork (reusable panels)
When buying, look for "WBP" or "phenolic" on the stamp. Do not confuse it with "MR" (moisture resistant) – MR is not fully waterproof.
Marine plywood – highest moisture resistance, zero voids
Marine plywood is the gold standard. It uses WBP phenolic adhesive and has no core voids – every layer is solid, continuous veneer. Why does this matter for mold prevention? Voids trap moisture and become mold reservoirs. Marine plywood's void‑free core means water cannot hide. It also has more plies per thickness (e.g., 13 plies for 18mm) for better dimensional stability.
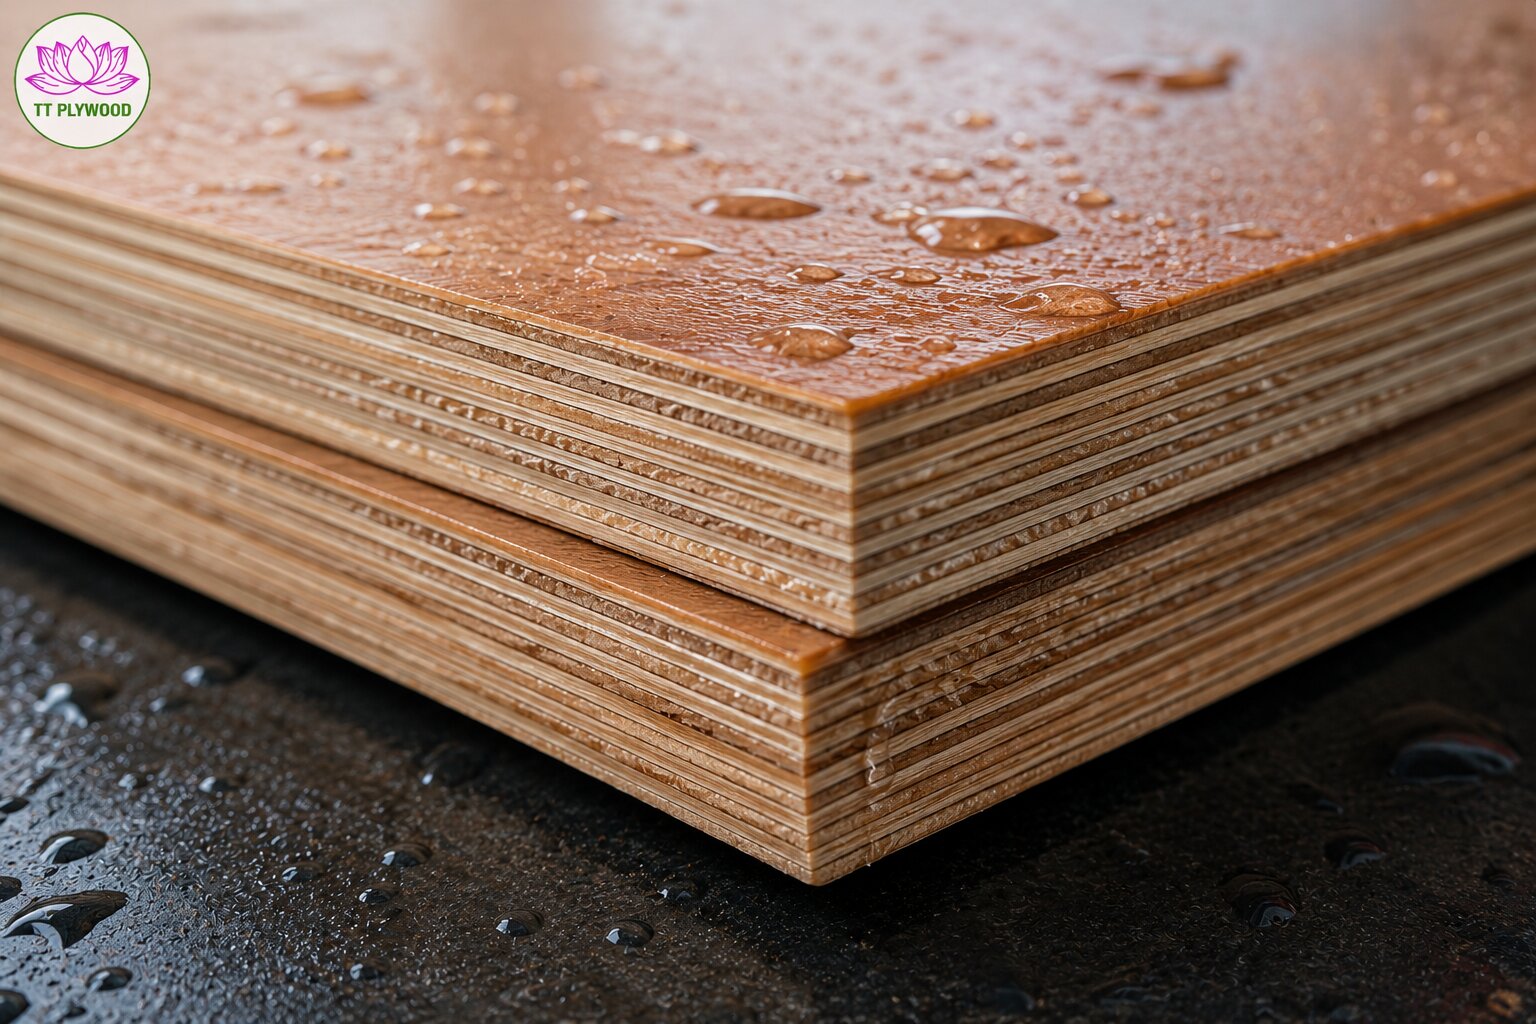
Use marine plywood for boat building, docks, outdoor kitchens, and any application where plywood will face constant wetting. The cost is higher, but it lasts 3‑5 times longer than exterior plywood in wet conditions.
Moisture resistant plywood (MR grade) – good for kitchens, covered areas
Moisture resistant (MR) plywood uses Melamine Urea Formaldehyde (MUF) adhesive, which resists occasional moisture but fails if submerged or constantly wet. It is suitable for:
- Kitchen cabinets (splashes, but not floods)
- Indoor furniture in humid climates (with good ventilation)
- Covered porch furniture
MR plywood is not for bathrooms, outdoor use, or basements. If you live in a region with 80%+ humidity, upgrade to waterproof or exterior grade.
Exterior plywood – suitable for outdoor furniture and sheds
Exterior plywood uses WBP phenolic adhesive but may have minor core voids (unlike marine plywood). It is designed for outdoor use where it will not be submerged. Examples:
- Garden sheds
- Outdoor benches and tables (sealed with paint or oil)
- Roof sheathing (under shingles)
- Construction hoardings
Exterior plywood is a cost‑effective alternative to marine plywood for most outdoor DIY projects. Always seal the edges and faces.
Avoid standard interior plywood in high‑humidity zones
Interior plywood (using MUF or urea formaldehyde adhesive) has no water resistance. It should only be used in:
- Dry indoor furniture (bedroom, living room, office)
- Interior walls and ceilings (no moisture exposure)
- Temporary projects
If you place interior plywood in a bathroom, laundry room, or unventilated basement, mold is inevitable – not a matter of if, but when. Your keyword research shows searches for treated plywood and pressure treated plywood; those are also better options because the chemical treatment inhibits fungal growth.
Long‑Term Prevention Tips
Maintain indoor humidity below 60% (use dehumidifier)
Mold struggles to grow below 60% relative humidity. The ideal range for plywood storage and use is 40‑50%. In humid climates or during rainy seasons:
- Run a dehumidifier in basements, garages, and storage rooms.
- Use exhaust fans in bathrooms and kitchens for at least 20 minutes after showers or cooking.
- Monitor humidity with a $10‑15 hygrometer.
If your plywood project is in a closed space (e.g., inside a cabinet), add passive ventilation – a few 1‑inch holes near the top and bottom allow air circulation.
Apply treated plywood or pressure‑treated for ground contact
For plywood that touches concrete, soil, or is exposed to standing water, upgrade to treated plywood or pressure treated plywood. These panels are infused with preservatives (alkaline copper quaternary or copper azole) that resist mold, rot, and insects. Pressure treated plywood is required for:
- Subflooring over concrete slabs
- Exterior walls in contact with masonry
- Raised garden beds (use only untreated if growing vegetables)
Pressure treated plywood is not fully waterproof on its own – still seal the edges. The treatment only protects against fungal decay, not water absorption.
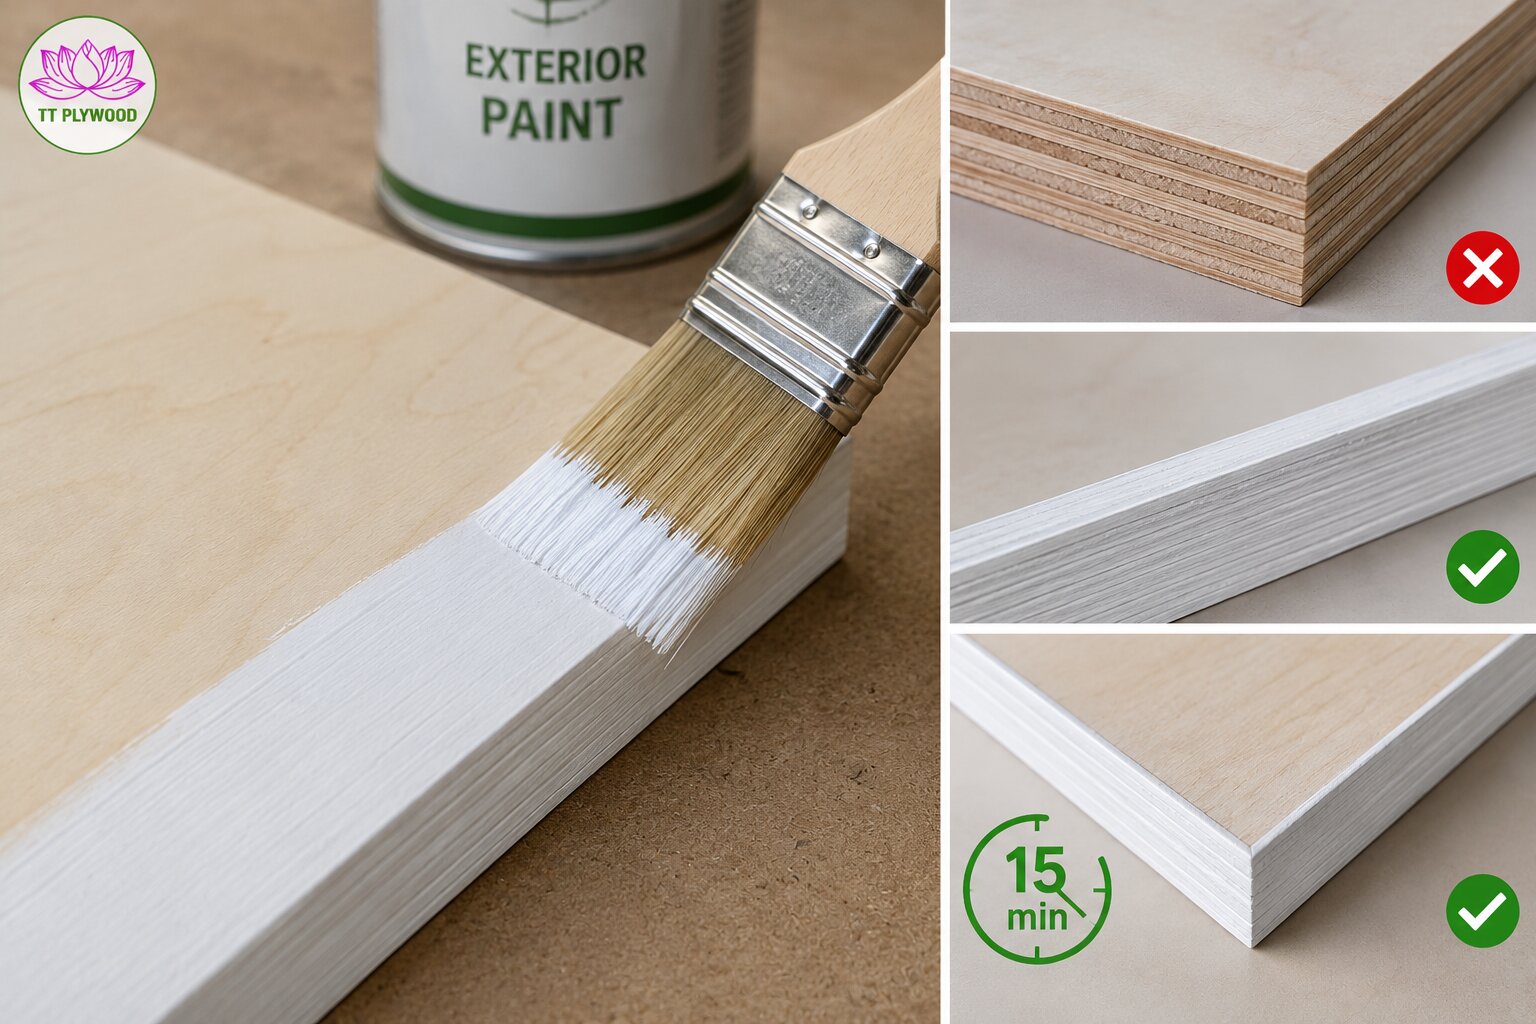
Seal all cut edges with exterior paint or phenolic coating
Every cut you make exposes raw, unsealed wood. This is where moisture enters fastest. After cutting plywood for your project:
- Immediately brush or spray the cut edges with exterior latex paint, spar urethane, or phenolic coating.
- For high‑moisture areas, apply a second coat after the first dries.
- For edge banding, apply before assembly – it's easier to reach.
Never leave raw plywood edges exposed in a bathroom, kitchen, or outdoor project. A 15‑minute sealing step can double the material's lifespan.
Elevate plywood off concrete floors to prevent wicking moisture
Concrete floors wick moisture from the ground. Even if the concrete looks dry, it can have a relative humidity of 80‑90% at the surface. Storing or installing plywood directly on concrete:
- Place plywood on pressure treated lumber strips (1x2 or 1x4) spaced 16 inches apart.
- Use plastic pallets or foam insulation boards as a barrier.
- Leave at least a 1/2‑inch air gap beneath the plywood.
For finished floors over concrete, install a vapor barrier (6‑mil polyethylene) before the plywood subfloor. This prevents moisture migration that leads to mold.
Frequently Asked Questions
Can I still use plywood that has mold?
Yes, if the mold is only on the surface and the plywood is structurally sound (no soft spots, no delamination). After proper cleaning, drying, and sealing, it can be used for furniture, shelving, or wall panels. No, if the plywood has deep rot, large soft areas, or visible separation between plies. In that case, discard it – the structural integrity is compromised.
Is vinegar or bleach better for plywood mold?
Vinegar is better. White vinegar penetrates wood fibers and kills about 82% of mold species. Bleach (sodium hypochlorite) does not penetrate wood – it only whitens the surface. Mold roots remain alive and will regrow. Additionally, bleach reacts with wood lignin, weakening the plywood over time. For severe mold, use a commercial biocide or borax solution, not bleach.
How long does it take for mold to damage plywood?
Mold can begin growing within 24‑48 hours on wet plywood. Surface discoloration appears in 2‑5 days. Significant structural damage (soft spots, delamination) takes 2‑4 weeks of continuous wetness. However, once you see visible mold, the plywood has already absorbed enough moisture to potentially warp or lose face bond strength. Act immediately – don't wait.
Conclusion
Mold on plywood is common but preventable. Start by identifying the cause – usually high humidity, direct water, or using the wrong grade. Clean surface mold with vinegar or hydrogen peroxide, dry the plywood to below 12% moisture content, and seal all edges. For new projects, choose waterproof plywood (WBP phenolic) for bathrooms and outdoor use, marine plywood for the highest protection, or exterior plywood for covered outdoor areas. Avoid interior‑grade plywood in any space that gets wet. Maintain humidity below 60%, elevate plywood off concrete, and seal every cut edge. With these steps, your plywood will stay mold‑free for years.
References
Forest Products Laboratory. (2021). Wood handbook: Wood as an engineering material (General Technical Report FPL-GTR-282). U.S. Department of Agriculture, Forest Service, Forest Products Laboratory.
Institute of Inspection Cleaning and Restoration Certification. (2021). ANSI/IICRC S520 standard for professional mold remediation. IICRC.
Kozlowski, R. (Ed.). (2020). Handbook of natural fibers (2nd ed.). Woodhead Publishing.
Lebow, S. T. (2010). Wood preservation (General Technical Report FPL-GTR-190). U.S. Department of Agriculture, Forest Service, Forest Products Laboratory.
Morrell, J. J. (2017). Wood deterioration and preservation: Advances in our changing world. American Chemical Society.
Scheff, P. A., Paulius, V. K., Huang, S. W., & Conroy, L. M. (2000). Indoor air quality in a middle school, Part II: Development of emission factors for particulate matter and bioaerosols. Applied Occupational and Environmental Hygiene, 15(11), 835–842.
U.S. Environmental Protection Agency. (2024). A brief guide to mold, moisture and your home.


